|
|||||||||||||||||||||||||||||||||||||||||||||||||
|
Originally I wanted to start with my NGW100 but had some problems to find all the needed information. I will have to dig around the web to collect these information and decided to create this page for all the other beginners. I did not invent the wheel again. This website just brings together some information which you will find at the following pages:
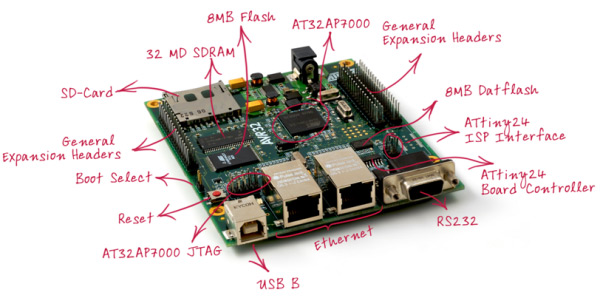
This website is a step by step tutorial how to set up your development tools, and update a NGW100. The next picture shows an overview of the NGW100, this picture can be found at the AVRfreaks wiki and in your local wiki running at the NGW100 too:
The tutorial below bases on Ubuntu 7.10 and Buildroot 2.1.0. We want to use the buildroot tool. Therefore we need a real Linux operation system, where I decided to use Ubuntu 7.10. I tried to get buildroot working on Cygwin and Mac OS X but without success. Here I use Ubuntu in a VMware, this has the advantage to be able to copy the image to a Windows or Mac OS X machine later too. Even you can pass your image to a friend who wants to start playing with AVR32 too. Download and install Ubuntu. For this tutorial here I will use an user avr32. Therefore create an user avr32 on your machine too. After you installed Ubuntu I highly recommend to update your installation. I had some problems with the network in my VMware, after updateing the problems were solved. You will need the AVR32003: Buildroot for AVR32 application note. I will refer to revision 32062C-AVR32-11/07. The buildroot page for ARV32 can be found at the ATMEL page. To fulfill the requirements of the buildroot you need to install some packages which are not available on a fresh installed Ubuntu. You can install the packages with a GUI or at the command line in a Terminal. Here I will use the Terminal, the syntax is: sudo apt-get install <package1> <package2> ... You must execute the apt-get command as the superuser, therefore we need the sudo command. Please open a Terminal and install the following packages:
Now you will meet fulfill the requirements and can download the buildroot itself. Buildroot is a big collection of makefiles. It will download all the needed sources from the internet to build the toolchain, linux kernel, filesystems and application for the NGW100. For my tutorial here I use buildroot in version 2.1.0 which can be downloaded here (6.2 MB). Please create a new directory, for example AVR32 in your home directory and store here the downloaded buildroot file there. Open a Terminal and change into the AVR32 directory. To extract buildroot, type: tar -xjvf buildroot-avr32-v2.1.0.tar.bz2 This will create a new directory called "buildroot-avr32-v2.1.0" with the source of the downloaded file. After this, cd to this new buildroot-avr32-v2.1.0 directory. Now you can follow the application note Buildroot for AVR. Chapter "4 Getting started for AVR32 target" gives you the instructions on how to start. I will use the NGW100 target and type: make atngw100_defconfig Remmeber, that you type this inside the buildroot-avr32-v2.1.0 directory. Buildroot will now load the board's configuration and save it in a file. Now we'll need the source for building the toolchain, linux kernel, filesystem and so on. Therefore type: make source Now all necessary packages will be downloaded from the internet, about 150MB. This can take a while and will depend on your internet connections speed. It is time to take a break. It is possible that the download process will not find all the sources. In my case fakeroot_1.8.10.tar.gz could not be found. At the time where buidroot-2.1.0 was created, fakeroot-1.8.10 was available. You will find the 1.8.10 version here, too. Please store this file under "buildroot-avr32-v2.1.0/src/dl". The command "make source" has created the "src/dl" directory under the "buildroot-avr32-v2.1.0" directory itself. Now you can type again: make source The result should now looks like:
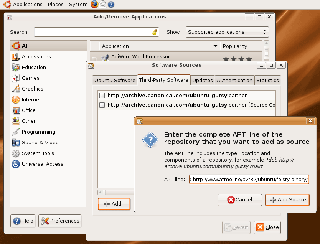
(Click inside the picture to expand) The next step could take some hours, depending on your cpu speed of the build machine, take a break. But before that, type the following command to start the build process: make When the build process is successfully finished, you will find the u-boot, root and user filesystem in the "binaries/atngw100/" directory. To download the new u-boot to the target we'll need the avr32program tool, which comes with the "STK1000 support software". This software comes from ATMEL and we must add a Third-Party Software directory to the Ubuntu installer. Therefore use "Applications => Add/Remove..." from the menu line of Ubuntu. The "Add/Remove Applications" window will be opened. Here press the "Preferences" button and navigate to the "Third-Party Software" folder. Press "+Add..." At the APT line type: deb http://www.atmel.no/avr32/ubuntu/feisty binary/ The result should looks like:
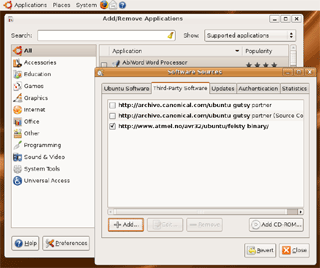
(Click inside the picture to expand) Press the "+ Add Source" button, and the dialog should looks like:
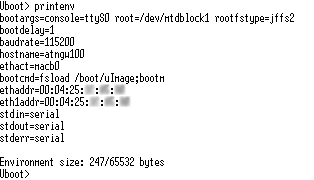
(Click inside the picture to expand) Press the "Close" button of the "Software Source" window and follow the instruction. A new window will open up, press the "Reload" button here. New packages information will be loaded from the internet. The window will be closed automatically afterwards. Close the "Add/Remove Applications" and open a Terminal window. Type here: sudo apt-get update Now we can install the "STK1000 support software" with: sudo apt-get install stk1000bsp This can take some minutes, depending on your internet connection speed. Now you installed the avr32-linux toochain, and even the tool avr32program which is needed to program the u-boot. The tool avr32program will be used to connect to a JTAGICE mkII over USB. Every time you use the avr32program you can use the sudo command, or grant access with the following hint from AVRfreaks wiki. On Ubuntu the "udev" part is working, therefore create a file called "avrtools.rules" in the directory "/etc/udev/rules.d" with the following content: # Atmel JTAGICE mkII After adding this file you must change the access rights to 644 of avrtools.rules, type: sudo chmod 644 avrtools.rules Now we must create a group avrtools and add the user avr32 (which will be our user name). To create a new group type: sudo addgroup avrtools Now add the user avr32 to the group avrtools, type: sudo adduser avr32 avrtools As I mention earlier, I am working with user avr32. If you created a different user, you must use this one for the adduser command. It is important to reboot your machine now. After rebooting open a Terminal and connect the JTAGICE mkII to your machine. Now we want to check if we can access the JTAGICE mkII. To check the USB bus in general type: lsusb This will list all the devices connected to the USB bus. My result looks like: Bus 002 Device 001: ID 0000:0000 The JTAGICE mkII is connected to your system, now type: avr32program --list the result should looks like: JTAGICE mkII <serial number of your device> You can find the serial number of your device at the botton of the JTAGICE mkII. If "avr32program --list" is not working, try to use "sudo avr32program --list". If this produces the correct output, you made a mistake with the avrtools.rules, or with the group/user setting. Now we have all the tools installed and can program the u-boot to the target. Before we can download u-boot, we must take a look at our MAC addresses from the network interfaces. Therefore connect a RS232 Terminal to the NGW100 with the following parameters: 115200, 8, N, 1 and connect power to the NGW100. If you see the following line from u-boot: Press SPACE to abort autoboot in 1 seconds press space and you will be directed to the u-boot prompt . Type here: printenv which will display the environment of your NGW100, it could look like:
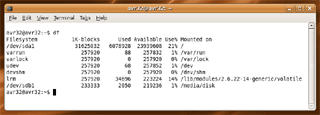
Note the values for ethaddr and eth1addr, you will need these values later. I blacked out the values here, because I do not want that you type in my numbers :o) Now we are ready to play a little with the NGW100. You can find this information at the AVRfreaks wiki too, but for the sake of completeness I will present it here too. Connect your JTAGICE mkII with the NGW100 and power the target (you must use the JTAGICE mkII, the older version JTAGICE can not be used here). At the build machine open a Terminal and type: avr32program erase -fcfi@0 This will erase the entire flash and takes some minutes. Now we can program the u-boot, therefore change in the binaries/atngw100 directory and type: avr32program program -F bin -vfcfi@0 u-boot.bin This will program the u-boot into the flash. Now we will download the filesystem by SD card in the next step. You will find the information at the AVRfreaks wiki too. But I will present you the way which was working for me. Becasue I must leave the way of the wiki, I had some problems because flash_eraseall could not be found. First of all, we will prepare a SD card with the files we have created from the buildroot step. Therefore we must format the SD card with an ext2 file system (wiki info). Insert a SD card in your reader, and type: df My result looks like:
(Click inside the picture to expand) Here the SD is mounted on /media/disk. Now we will format the SD card and create the ext2 file system. Double check which device is your SD card, I must use /dev/sdb1 here.
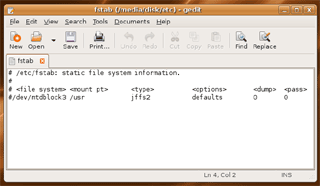
If the last command produced an error, like "mount point /media/disk does not exist". Remove the SD card and insert it again. The system will auto mount the card for you. Now we can copy the files from the buildroot step to our SD card. Go to /media/disk and type: sudo cp $HOME/AVR32/buildroot-avr32-v2.1.0/binaries/atngw100/rootfs.avr32_nofpu.jffs2-root . Do not forget the dot after -root [space][dot]. This command copies the root file system to the SD card. Now we must copy the usr file system to the SD card too: sudo cp $HOME/AVR32/buildroot-avr32-v2.1.0/binaries/atngw100/rootfs.avr32_nofpu.jffs2-usr . These two files will be copied later to the flash of the NGW100. But the target needs a filesystem to boot from SD card, therefore type: sudo tar -xvf $HOME/AVR32/buildroot-avr32-v2.1.0/binaries/atngw100/rootfs.avr32_nofpu.tar This will expand and copy the root file system to the SD card. Now we must solve a little chicken egg problem. The files system on the SD card will mount the usr file system from /dev/mtdblocks3 which is part of the flash. But we want to use the usr file system from our SD card. Therefore we must edit the fstab file on the SD card now. Add a "#" in front of the /dev/mtdblock3 line of the fstab. Start the editor with: sudo gedit /media/disk/etc/fstab After adding the "#", the result should now looks like:
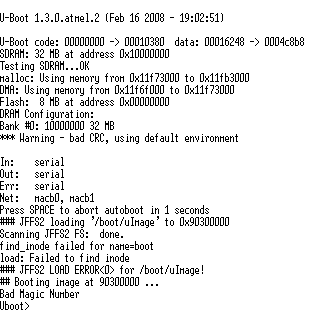
(Click inside the picture to expand) After saving the changes, you can close the editor. Change your position to /media and unmount the SD card with: sudo umount /media/disk Now we have prepared our SD card and can go to the target. Connect a RS232 Terminal to the target with the following parameters: 115200, 8, N, 1 If you powered the target, the result will looks like:
This is our u-boot which we copied to the target. But it could not find a root file system. In the next steps we will download the root/usr file system to the target. I found some information in the forum and even you can find some information on the wiki. With a mix of both I came to my solution. Insert the SD card and type the following at the u-boot prompt:
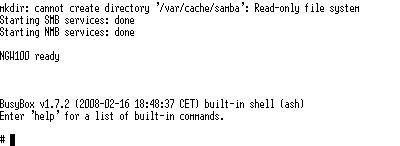
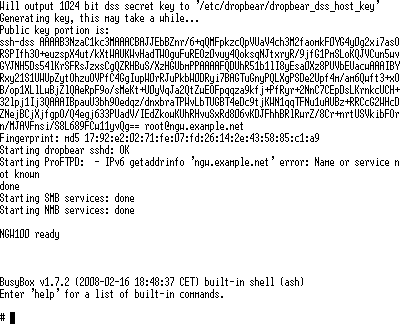
Now the NGW100 will boot and use the file system which we have copied to the SD card. The last output from the Terminal will looks like:
Now we will erase the flash and copy the new file systems. Double check that you type the correct mtdx device. Otherwise it is possible that you delete your whole u-boot partition and you will hace to start at the beginning to flash the u-boot with the JTAGICE mkII again. The erase procedure will take a while, but here you will see some progress. The dd commands take some minutes too. It my seen that the targets hangs. Do not break the command, the prompt will return. Type the following at the BusyBox:
Now the root/usr file system is flashed, and we can start the target again. But we must take a halt at the u-boot and change something of the bootcmd arguments. After the reboot u-boot is started. If you see the line: Press SPACE to abort autoboot in 1 seconds Here press the space to enter u-boot. But first we must reboot the NGW100. Therefore type at the BusyBox: reboot If you see "Press SPACE to abort autoboot in 1 seconds" press space and you will be directed to the u-boot prompt. Here type the following: setenv bootcmd 'fsload /boot/uImage;bootm' Now we must save the changes, type: saveenv This will store our changes in the flash. Now remove the SD card and boot the NGW100 with: boot The NGW100 will now boot and at the end the Terminal should look like:
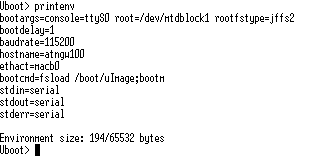
Congratulation, you successfully updated u-boot and downloaded a new root/usr file system to your NGW100. Oops, your network may not work, because you did not set the MAC addresses of the network interfaces. This must be done in u-boot. Therefore restart the engine and set the MAC addresses, type at the BusyBox (you should know now how to stop u-boot): reboot We want to take a look at the u-boot environment, therefore type at the u-boot prompt: printenv The environment of my NGW100 looks like:
Here ethaddr and eth1addr are missing which represents the MAC addresses. To set these adresses type:
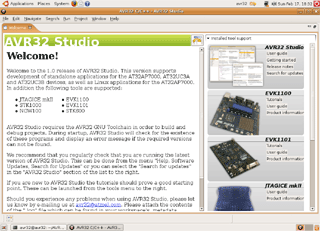
The addresses I used here, are fictive. You must use your own addresses which you listed in the chapter about the "Download u-boot". Btw, if you want to halt your NGW100, type halt at the BusyBox and wait for: System halted. Now you can power off the target. AVR32 Studio is based on Eclipse which is a Java application. Check which Java is installed on your machine, type: java -version This will produce here the following result: java version "1.5.0" First of all we will update the Java to 1.6.0. Therefore open a Terminal an type: sudo apt-get install sun-java6-jre This takes a while and will update your Java to 1.6.0_03. From one of the steps above you created a directory called AVR32 where you placed the buildroot bz2 file. Now download the AVR32 Studio from ATMEL and store this file in the AVR32 directory too. The AVR32 Studio can be found here. Download the AVR32 Studio for Linux, currently, version 1.0 of AVR32 Studio is available. You must register to download the file. Open a Terminal and go into the AVR32 directory. Now we want to expand the AVR32 Studio, type: unzip -x avr32studio-1.0-linux.gtk.x86.zip This will create a new directory "avr32studio" with all the AVR32 Studio programs. Change into this new directory. To start AVR32 Studio, type: ./avr32studio This will start AVR32 Studio and you will be asked about the workspace. The workspace is the place where all your AVR32 Studio projects will be stored later. After you chose the workspace, the window will look like:
(Click inside the picture to expand) Now my story is over, and you can play with your new toy...
|
||||||||||||||||||||||||||||||||||||||||||||||||